


Products
News
Contact
- Qinsun Instruments Co., Ltd.
- Tell:+86-21-6780 0179
- Phone:+86-17740808215
- Address:No. 2578 Minhang District Gu Dai Road, Shanghai
- Contact:Mr. Li
- QQ:846490659
Gakushin Abrasion Tester
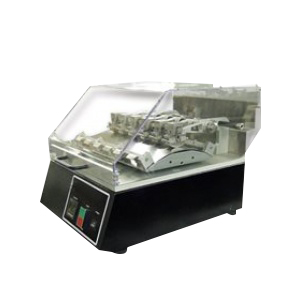
Each station is equipped with a removable rub head and set of table clamps to facilitate up to six unique specimens tested simultaneously.
Standard Rub Heads are 200g or 500g and come with spring clamps to attach specimens, crocking cloths, or abradants. Other rub head geometry and weight are available.
Each test arm is counterbalanced to ensure that the test is performed with only the prescribed weight required. Available test weights include 300g, 500g, and 800g and may be used with either standard rub head.
Applications
The 6-station bench-top Colorfastness/Rubbing Tester is used to determine crocking, color transfer, and abrasion resistance of leather, fabric, vinyl, stitched seams, plastics and other materials. Each station includes a pair of suitable clamps to fix the sample on the movable plate and force friction arm. This friction arm has two clamps for fixing the friction materials.
Working Principle
Load the required test stations, and lift the friction arm to the unused test stations. Set the counter to the desired number of cycles required by the standard, and star the test. The instrument automatically stops when reaching the specified number of cycles. Visually assess the test samples. This is a heavy-duty machine capable of operating with 1,800g on each station to meet some of the more rigorous industry specifications.
Standards
JIS L0823 Section 3.2;JIS L0849 Type II;Mazda MES MN 405;Nissan NES M0 155 Section 16;JIS 10801;JIS 0862;JIS 1084;TR 396B;TSL5100G Section 4.8.1A;ISO 874;TSL5101G Section 4.19.1A;Subaru
Basic Structure
Loading Sequence
· Load test samples on either the 200-gram or the 500-gram heads.
· Place the desired weight on the heads.
· Load abrasion material on the curved oscillating plate.
· Leave unused heads flipped back to rest position.
Machine Operation
· Turn on the main power switch, which is located on the front of the electrical enclosure.
· Set the counter to the desired number of cycles. (see counter set-up below for details)
· Press the green button to start the oscillating plate.
· When the number of cycles is complete, the oscillating plate automatically stops.
· The reset button on the counter must be pushed before a new test can be run.
· Pushing the red button on the control panel stops the test anytime. (Count does not reset.)
Counter Set-up
· Press the PROG button one time.
· The SEL button moves the curser to the digit to be changed.
· Press the button under the blinking curser to advance to the next higher number.
· When completed press the PROG button again to save the new count into memory.