Ⅰ,Fabric Breaking Strength:
Fabric breaking strength is also can be called tensile strength, which refers to as the maximum tensile force when the specimen is stretched to break. It is one of the main standards to assess the intrinsic quality of textiles. The unit of fabric breaking strength is “Newton (N)” and it is used to evaluate the capability of the fabric to resist to tensile damage.
Ⅱ,Breaking Strength Testing:
Testing instruments and materials
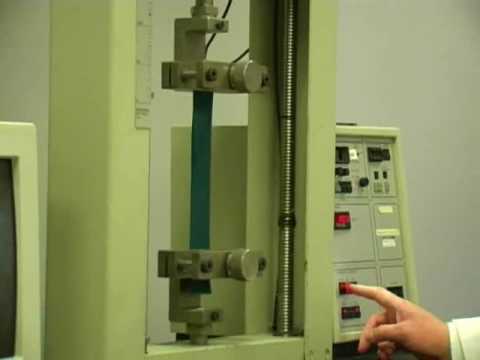
Textile tensile testing machine(Picture 1),a number of woven fabrics, fixtures, pre-tension, etc. .
Testing principles:
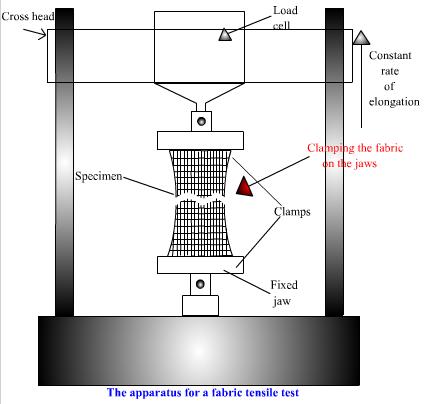
A sample of a predetermined size is stretched at a constant elongation rate until it breaks, and record the breaking strength, elongation at break, etc.
Testing methods:
The common testing methods of breaking strength include reveled-strip method, grab method, shear strip method. (Picture 2) For the testing of woven fabrics, the reveled-strip method is used frequently. For some fabrics that can not or can not easily remove the edge, such as knitted fabrics, nonwoven fabrics, coated fabrics, etc., they can be tested by shear strip method. The width of the sample must be strictly controlled, otherwise it will greatly disturb the testing results.
(1) Prepare for the samples:
Take several pieces of fabrics, the length is about 35cm, the width is about 6cm, then remove the yarn on the edge of the fabrics and make the samples have a width of 5cm, and a length of 30-33cm.
(2)Testing steps:
Plug in and turn on the switch, the screen shows the starting up notification. Press “F4 ” , the screen displays test screen. Start testing in this screen interface and check the testing data.
Press the “function” key to enter the test method selection screen, press “Fl” and “F2 “to select the testing method (here you can choose the strip method to test). After selecting, press “confirm” key to enter the parameter setting screen; If the test method displaying on the interface currently is the method that you are going to choose, then without changing the test method, you can press the “set” key to enter the parameter setting screen directly.
Move the cursor and input the relevant parameters. After completing, press the “confirm” key to enter the testing state screen. (Chart1)
Select the required fixtures for the test and install it on the machine. The upper fixture should be installed below the sensor and connected to the sensor, and the lower fixture should be mounted on the pedestal.
Move the stopper on the limit lever to the positioning hole corresponding to the test method and lock it to adjust the clamp distance.
Set the speed of stretching and recovery. Press the “speed control” key to enter the speed setting screen, and input the corresponding parameters by pressing the “F2” “F3” key(“←” “→” key) and the number keys. Then press “F4” key (“confirm” key) to exit the speed setting screen.